Access Control
Effective access control is a core part of both the Archon Environment and the regulatory frameworks that govern software. Here's an overview on how access control works in an Archon Environment.
Our access control system should feel like Amazon Web Services' IAM. This similarity isn't an accident! AWS IAM is designed to flexibly accommodate complex regulatory requirements just like Archon's Access Control
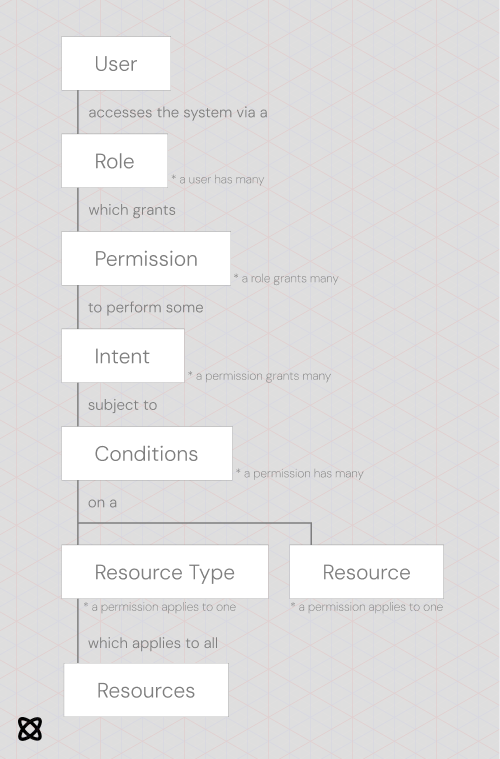
We'll break these pieces down one-by-one
User
A user represents the identity of any entity that accesses the Archon Environment. This entity could be a human, an automated service, or anything else. Users authenticate with the system as described in 5. Authentication. Most importantly, users have Roles that determine what they can do while logged in.
Role
A role determines what a user can do while using your application. Roles should be scoped by individual stakeholders to support the principle of least privilege, which is a federal requirement.
As an example, a user may have
- A role for accessing the application normally (i.e.
default-user)- This role could grant access to view public resources with specific metadata tags (see Metadata) or to create some resources of their own
- A role for administrating other users' content (i.e.
content-admin)- This role could allow the user to read and delete other user's personal resources.
- A role for accessing settings of the application (i.e.
resource-settings-admin)- This role could allow them to access an administration panel for specific settings
In our example, a user can be assigned all 3 roles at once, but can only use the permissions from one at a time (i.e., if a user is a content-admin, they cannot perform actions for resource-settings-admin unless they switch roles). To use permissions from their other roles, users must switch from one role to another. (See Switching roles)
Privileged roles
Some roles may provide access to sensitive or security functions. Federal regulations dictate that these roles are "privileged" and assign additional restrictions to them. When creating a role that:
- administrates other users
- accesses security functions of your application
- or takes any other "admin" or "super-user" activities on your application
you must designate it as a privileged role. Refer to roles for details.
Users must re-authenticate when switching to a privileged role, regardless of whether their previous role is privileged. Follow norms outlined in Switching to a privileged role for effective integration.
Permission
Roles grant many permissions. By default, a user is denied access to any resource unless they have access via an applicable permission.
Permissions can both ALLOW and DENY access to certain resources, depending on configuration.
Who can use a permission?
A permission is always bound to a role. A user can only take advantage of a permission when using the role that the permission is bound to.
A permission can optionally apply to a specific user only. This is useful if you want to grant access to one specific resource, but should generally be avoided in favor of Conditions where possible.
The user must be using the correct role to use the permission, even if it's bound to the user specifically.
What does a permission apply to?
A permission can either apply to
- A resource type
- A specific resource When applied to a resource type, a permission will apply to all resources of that type, unless altered by the permission's conditions.
Conflicting permissions
Conflicting permissions occur when some applicable permissions allow access to a resource and other deny access to a resource. Conflicts are resolved in the following order.
- Permissions applying to a specific resource take priority over permissions applying to a resource type
- Then, permissions applying to specific users take priority over permissions applying to entire roles
- Then, permissions with conditions take priority over those without permissions
- Finally, denying permissions take priority over allowing permissions
Permissions are always guaranteed to apply in a stable order. Given two identical permissions, one will always take priority over the other.
Intent
Intents are actions that can be taken against a specific resource. They are defined on the resource type level, so all resources of a certain type have the same intents.
For instance, a chat resource type may have a read-chat and a delete-chat intent.
A chats resource type (a singleton that aggregates all chat resources in an application) may have a disable-chats-function intent that disables all chat functionality in an app.
Permissions only apply for specific intents. A permission may grant access to a read-chat intent but not a delete-chat intent.
Conditions
Conditions allow developers to define custom rules on when certain permissions apply. They're written in JSON and provide access to request-level information when run.
Applicable conditions are calculated last after all other determinations are made.
For example, this condition would make its associated permission apply only when the user's uuid matches the creatorId tag in a resource's metadata
[
 {
  "condition": "matches",
  "first": "{{user.uuid}}",
  "second": "{{resource.metadata.creatorId}}"
 }
]
See Conditions for guidance and a list of available conditions
Resource Type
Resource types represent categories of resources. For instance, an individual chat might be of type chat or an individual document of type document. All resources have a resource type.
Resource types determine what intents can be taken against a resource. A chat resource type may provide a read-chat intent and a send-chat intent.
Resource
Resources are the core building block of the access control system. A user performs intents against a specific resource.
A resource is anything a user takes action with. Typically, you should consider assigning a resource any time you create a database entry.
ARIDs
Your application must keep track of mappings between Archon's resources and your actual data. To support this, every resource is assigned a unique identifier called an Archon Resource Identifier (abbreviated ARID).
When creating a resource, an ARID is typically returned. You should store this ARID alongside the relevant data so you can perform permission checks later
Metadata
Resources can also have metadata in the form of JSON objects. You can store any JSON-serializable information in the metadata field, but you should account for the following considerations
- Do not store sensitive information in the metadata. Users may be able to see the metadata even without permission to the underlying resource
- Store as little information as possible. This will make resource retrieval and permission calculations faster.
Archon components will often assign metadata tags to resources they create. Here are some common ones.
~archon: Set if the resource is generated for a system purpose. You should not edit resources with this property set to true.name: Sometimes set to a human-readable name of the resource. Will display in the admin panel if set.
Other considerations
Switching roles
Users, by default, will be signed in with their default role. If a user needs to switch roles to perform some action, your application can switch their active role via methods in the SDK.
Switching to a non-privileged role
Switching to a non-privileged role can be done without re-authenticating the user. However, for the best user experience, you should
- Prompt the user before switching their role
- Provide some form of visual indication that a user's active role has changed
- Switch them back to their default role once you've performed necessary actions in their alternate role
As an example, here's switching a user's role in the NodeJS SDK for Government
const session = await getSessionFromReq(req)
const roles = await getRoles(session.user)

// select a role from this list
const role = roles[0]

await switchRole(session, role)
Switching to a privileged role
Switching to a privileged role requires a user to re-authenticate. To switch a user to a privileged role, you will need to create a role change request.
- A role change request must include the user to switch, the desired role, a callback URL, and a reason for the switch. This reason is visible to the user and in the logs.
- Creating a role change request will return a token for the user to re-authenticate with
Here's an example role switch request in the NodeJS SDK for Government
const session = await getSessionFromReq(req)
const superUserRole = await getRole('super-user-role')

const rcr = await requestPrivilegedRoleSwitch(
	session.user, // the user
	superUserRole, // the desired role
	Archon.getPublicUrl() + "/your-link", // the callback url
	"To access the administrator panel" // the reason
)

res.redirect(rcr.authUrl);
// or send them to "/.archon/authenticate/switchRole?nonce=" with the following nonce
const nonce = rcr.nonce;